Stage 2 Open Fermentation
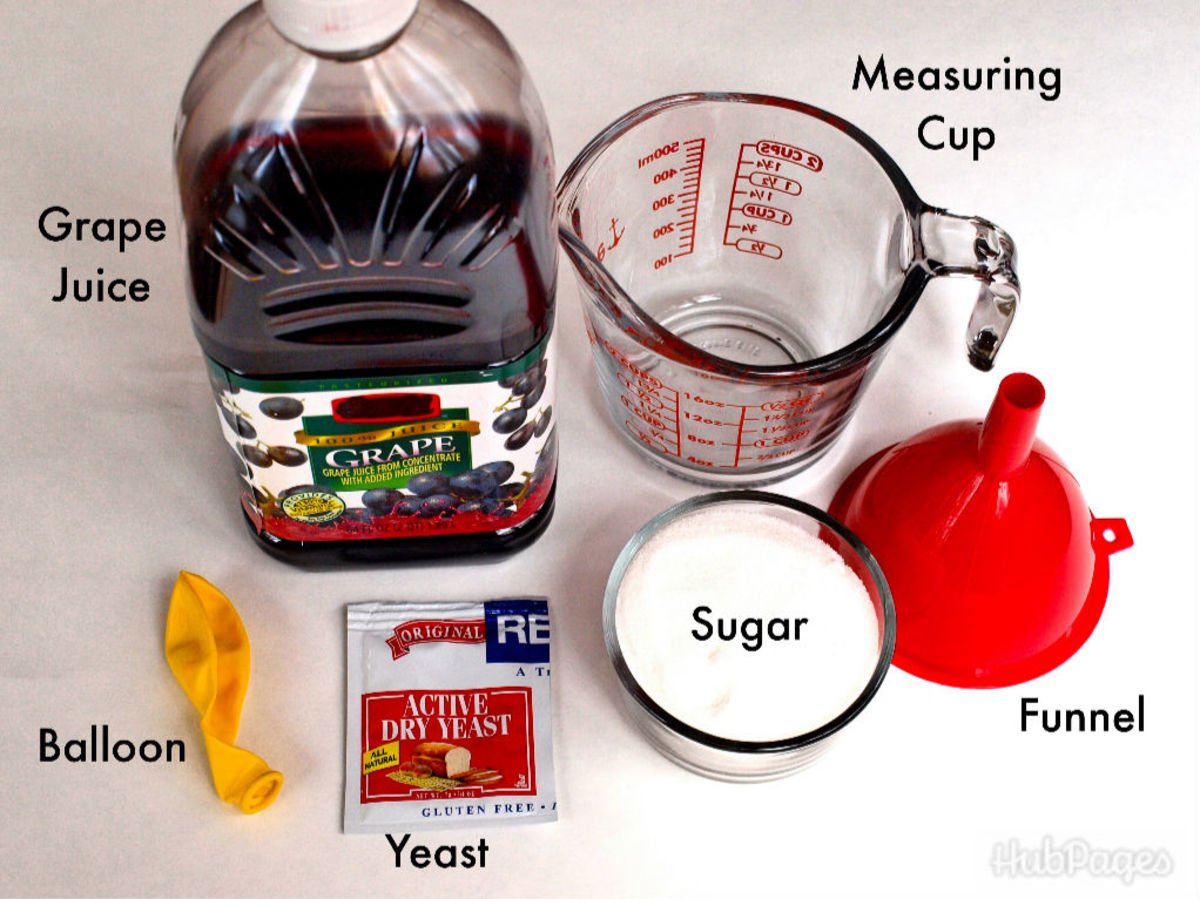
Before we can start fermentation we need to add sugar to the must. The type of sugar you use depends on which kind of flavour you’re after: cane sugar, beet sugar and brown sugar will all produce different effects. Whichever you choose, the yeast will work its way through the sugar until it is used up or until so much alcohol is produced that the yeast dies. This recipe will give a wine with about 13-15% alcohol. You are now ready to add your yeast, the miracle that makes wine work.
Once you have added, or pitched, the yeast into the must give it a good stir. Over the next 24 hours you can watch as the calm wine-dark sea is disturbed by bubbles of carbon dioxide coming to the surface. Yeast can live with or without oxygen but it can create much more energy with it, so we start our fermentation open to allow the yeast to multiply and completely take over the must.
As the yeast cells respire, a stormy raft of bubbles will form and a dark earthy smell will erupt from the depths. You should leave this mixture for 5-7 days in a warm place , stir it each day and watch as the yeast makes it “boil”. It is this process that gives fermentation its name, from the Latin word fervere, “to boil”. There are many species of yeast but most winemaking is done using the reliable Saccharomyces cerevisiae. There are hundreds of strains of C cerevisiae, each releasing different flavours and surviving different amounts of alcohol, so the choice is yours.
Basic Wine Making Supplies
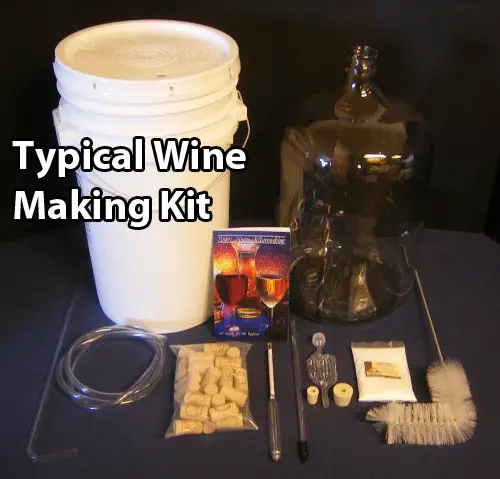
In general, the basic equipment can be broken down into 3 categories: containers, stoppers, and tools.
Containers: When making wine you will need a minimum of 3 kinds of containers:
- A primary fermenter to begin the fermentation in. Buckets tend to make great primary fermenters because they are easy to clean and have extra space for blow off when the wine is very bubbly.
- A secondary fermenter to stabilize and condition the wine in. Secondary fermenters should be glass or plastic carboys with minimal headspace, so that the wine isnt exposed to too much air.
- Vessels to store and serve the wine. Bottles, jugs, or bags can be used to store and serve the finished wine from.
Closures/Stoppers: These are used to protect the wine. It lets gases to escape, but doesn’t let anything go into the vessal. When wine is in the primary and secondary fermenters you will want to have an airlock and rubber bung. These will seal the wine from outside contaminants, while also letting the gasses from the fermentation process to escape. Corks, screw caps, or spigots can then be used to seal the finished wine and keep air out to stop from spoiling.
Tools: There are plenty of winemaking tools that make the experience easier and can be used to enhance the quality of wine. However, if youre looking for the basics that are absolutely necessary. They are:
If this is your first time, dont fret, Dannys has a number of all-in-one starter equipment kits ready to pick-up in store or ship.
Equipment Needed To Make A Wine Kit
Wine kits are a great way to get started in winemaking and can provide loads of enjoyment in the grape harvest off season. A wine kit consists of concentrated wine-grape juice and various additive packets used to steer the wine through to completion. In general, a wine kit includes all of the consumables needed to make the wine but does not include any of the winemaking equipment. This comprehensive list covers the equipment you will need before making your wine kit. Once you purchase your equipment, you can make many, many wine kits without any further equipment costs. Everything on this list can be found online, at a local brew shop, or through the second hand market. So here’s what you need…
Primary Fermenter
A primary fermenter has an open top to easily allow stirring and punching down of grape skins. It also is not oxygen tight and allows the wine to have some air during the vigorous fermentation stage. For wine batches up to six gallons, a food grade bucket is your best bet for a primary fermenter.
Carboy
Bung and Airlock
To seal the top of a carboy, a bung and airlock are used. Airlocks come in several configurations, but my go-to is the age-old double bubble or s-type airlock. When filled with water, an airlock completely seals the carboy from air, while allowing CO2 to escape as the wine finishes up.
Racking Cane and Transfer Tube
Sanitizer
Bottles
Bottle Filler
Corks
Corker
Summary
Recommended Reading: Total Wine Nebraska
How Do You Make Homemade Wine Stronger
Here are some other tips for producing wines with high alcohol levels.
What Ingredients Do You Need To Make Red Wine

Red wine production requires no cooking or ingredients besides grapes, yeast and, usually, sulfur dioxide as a preservative.
You May Like: Stella Rosa Peach Alcohol Content
How To Make Wine From Grapes: Get Your Creative Juices Flowing
McKenzie Hagan | April 19, 2021
Whether you fancy yourself a DIY savant who’s intrigued by the idea of homemade wine or an oenophile who simply wants to learn more about the art of winemaking, this guide on how to make wine from grapes has your name written all over it.
Making wine is one of those time-honored traditions that has been around for almost as long as humankind has needed a drink. But even though wine has been a common pleasure throughout the centuries and across all cultures, there’s still a bit of mystery surrounding the details of how to make it.
Well, we’d like to change that. Join us as we take you on a journey that will decode the evolution from grape to glass and give you an even greater appreciation for this magical metamorphosis.
Sweetener And Fermentation Inhibitor
If you’re making a sweet wine or dessert wine, the best way to allow this to happen is to allow the wine to ferment fully and then reintroduce sweetness with a sugar solution and potassium sorbate. Potassium sorbate will keep the yeasts in the wine from fermenting the sugar you’ve added, but it won’t stop the wine from fermenting if you add it earlier in the process.
Read Also: Red Wine On White Shirt
Making Wine From Fresh Grape Juice
Using fresh pre-pressed grape juice is another way to make wine with fresh ingredients, but without the hassle of having to destem, crush, and press the grapes yourself. Fresh juice is available year round from reputable companies and generally comes in 20L plastic pails . As a bonus, these pails can work well as a primary fermenter! They generate great tasting wine in a number of varieties and are an excellent choice for the beginning wine-maker because all of the ingredients are already accounted for.
Or view our Fresh Grape Juice Selection
Other General Wine Making Tips
- Pectic enzyme: When using liquid, use 5 to 10 drops in fruit wines instead of the teaspoon measure listed in most recipes. The teaspoon measures in recipes are for powered pectic enzyme.
- Campden tablets: 5 Campden tablets are the same as 1/4 teaspoon of metabisulphite.
- Never boil corks: Soak your corks in a solution of hot tap water and a crushed Campden tablet for about 15 minutes. Then rinse well and cork your bottles.
- Aging: Most fruit wines should be aged at least 6 months to 1 year. Of course, some wine can benefit from longer aging depending on acid and tannin levels.
- Stabilizer: A common wine stabilizer is potassium sorbate. Do not overuse it the recommended dosage is 1/2 teaspoon per gallon.
——–
You May Like: How Many Carbs Wine
Learn The 5 Steps Of The Wine Making Process
Wine making has been around for thousands of years. In its basic form, wine production is a natural process that requires very little human intervention. Mother Nature provides everything that is needed to make wine it is up to humans to embellish, improve, or totally obliterate what nature has provided, to which anyone with extensive wine tasting experience can attest.
There are five basic stages or steps to making wine: harvesting, crushing and pressing, fermentation, clarification, and then aging and bottling. Undoubtedly, one can find endless deviations and variations along the way. In fact, it is the variants and little deviations at any point in the process that make life interesting. They also make each wine unique and ultimately contribute to the greatness or ignominy of any particular wine. The steps for making white wine and red wine are basically the same, with one exception. The making of rosé wines and fortified or sparkling wines is also another matter both require additional human intervention to succeed. Learn more about wine and what goes into every bottle by reading our wine glossary index.
How Long Does Fermentation Last
Unlike the typical four to seven days the primary fermentation takes, the secondary fermentation will usually last anywhere from one to two weeks depending on the amount of nutrient and sugars still available. So as you can start to see, the secondary fermentation is much slower with less activity at any given time.
Also Check: Stella Rosa Wine Mini Bottles
Wine Making Supplies: What You Need To Make Your Own Wine
By | Submitted On November 12, 2010
The home brewing of spirits, especially wine, has become a popular hobby for many persons. Some do it for the joy of making their own brand of wine, others do it for the challenge, but all of them get to enjoy the fruits of their labor in the end, which is really what it’s all about. Before getting started though, it is absolutely imperative that you have the correct equipment. Below is a general list of Wine Making Equipment and steps to help you on your journey to creating your personal vintage.
Sterilization of Wine Making Equipment
Before a single sip can be made, all of the wine making equipment should be properly sterilized. This will help to ensure that bacteria and other harmful contaminants will not be present in your drink. If you purchase a brewing kit, follow the enclosed instructions, otherwise, you should ask persons where you purchase your equipment for the best method to use.
Containers
You will need several types of containers to use through out the brewing process.
Miscellaneous Equipment
You will need a stopper and airlock gasket for the carbuoy, as mentioned previously, but you will also need corks and a corker to achieve and store your final product. These can be purchased at your local home brewing store. Lastly, you will need several siphoning tubes and a funnel to take the wine from the carbuoy to the bottles.
How To Make Wine At Home

Its no more complicated to make wine than sourdough bread, but it requires more time and a few special tools. Youll also get to put your creative juices to use and gain a better appreciation for professional winemakers.
The instructions below will make five gallons of traditional grape wine, which should work for any beginner. Youll need approximately $400 for grapes and basic supplies found on many websites or at local brewing/winemaking stores. Merchants like Midwestsupplies.com, PIwine.com and NapaFermentation.com offer starter kits at reasonable prices.
Recommended Reading: Best Gluten Free Wine
Making Wine From Kits
Who can say no to wine at $3 to $7 that tastes like you paid $10 to $25 for it? No one, that’s who! If you like wine you should at least try to make it once to get a better understanding of how rotten grapes can taste so good. And ending up with 30 bottles of wine is pretty swell.
Instructions For Making Fruit Wine
Country wines or fruit wines are a great choice for an alcohol drink to match with a fine meal of fish and chicken. Whats nice about it is you can choose from different types of fruits as a base!
Whether its homemade strawberry wine or banana wine, you can make it using our recipe.
Just a little warning, youll need lots of patience. The process can be long and might take you nothing short of 6 months. But, trust us, its worth the wait!
Recommended Reading: Stella Rosa Birthday Cake
Basic Wine Making Equipment List For Beginners
If you want to jump right into making wine without using a pre-made wine making kit, it can be done just fine. But there are certain pieces of equipment that you should have. With that in mind Ive put together a basic wine making equipment list for beginners.
- Primary & Secondary Fermenters/Carboys: These can be made of plastic or glass, with both having pros and cons to using either one, and are used for the fermentation of your wine. A primary fermenter is used for the first 5 to 7 days of fermentation. The secondary fermenter is used to finish the fermentation.
- Air Lock & Rubber Stopper: The rubber stopper is used to attach the air-lock to the top of the secondary fermenter. The rubber stopper has a hole in the center to which the air lock is placed. The air-lock allows gases to escape from the secondary fermentation without allowing: air, bugs, mold, bacteria and other little nasties from getting in.
- Spoon: You need a long stirring spoon so that you can reach in the fermenters and stir the wine. May not seem all that important now, but once you get in the middle of making your wine having a long-handled spoon will be one piece of wine making equipment youll be glad you got. Stirring allows you to mix the wine making ingredients and break up any pulp that may rise to the top during the primary fermentation.
Checklist Of Home Winemaking Equipment To Purchase
To save yourself time, you can purchase a high-quality winemaking kit. This is a great way to start. If you are really committed to the process, here is a list of what you need to get started.
If you decide you going to purchase juice instead of starting with grapes, you can eliminate some of the equipment above. This can speed up the process, but also takes some of the fun out of the process!
You May Like: Austin Hope Cabernet Costco
Mixed Acid / Acid Blend
As the name suggests acid blend is a mix of acids, most commonly citric, tartaric and malic acid.
These three kinds of acid are the most common in grapes but are also in most other fruit but at lower levels. The mix of acid is often the quickest and easiest way to have a balanced acidity when we are unsure of the particular acid content of the fruit we are making wine with.
How Long Before I Can Drink It
Wineworks Superior wines: These usually take 10-15 days to ferment, and a further week to clear. Again the wine can be drunk immediately but we recommend ageing it 4 weeks but you can leave it up to 12 months. The time you will leave it will depend very much on your stocks. So get plenty built up. The reds benefit more than the whites with ageing. Certain kits are suited more to the experienced wine maker and take around 4 weeks to ferment and then left for a further 2 weeks. These products does really benefit from ageing. All the kits we list in this section require little ageing.
Recommended Reading: Stella Rosa Red Reserve Wine
Can You Make Wine Out Of Any Fruit
Fruit wine can be made from virtually any plant matter that can be fermented. Most fruits and berries have the potential to produce wine. The amount of fermentable sugars is often low and needs to be supplemented by a process called chaptalization in order to have sufficient alcohol levels in the finished wine.
Filtering And Clarifying Of Wine

If the wine has not clarified itself, you should it gain the right transparency and colour. Sometimes, to remove turbidity it is enough to filter the wine in a funnel . Turbidity can also be removed easily and effectively using fining agents. Clarification is carried out at the lowest possible temperature. Remember to make a clarification test first . Observing the reaction, you can properly choose the type and amount of the fining agent. Klarowin is the most popular and effective agent in the vast majority of cases. Use 5 to 20 g of Klarowin per 10 litres of wine. This agent is very safe and natural. Other fining agents include: acid gelatin , tannin , activated carbon .
Read Also: What Wine Can You Have On Keto
Instructions: Making Wine The Easy Way
